Font size and column width (LaTeX)
Optimal column widths are claimed to be between 50-75 characters per line. So, if given a font-size in pt, what is an acceptable width of the text area?
This depends on the average character width, which in turn depends on the font, font-size, the text (more "i"s or "W"s?), and kerning. Given font and font-size, a rough measure of the character width is given by the alphabet length/26.
I am using the usepackage{lmodern} font in a 10pt size. The exact name of the text font is then lmroman10-regular, which you can see by viewing the pdf with Adobe Reader, then going to File -> Properties -> Fonts.
I created a test document with the line
abcdefghijklmnopqrstuvwxyz
I opened the pdf in Illustrator (after installing the missing font
from here
from C:\Program Files\MiKTeX 2.9\fonts\type1\public\lm) and measured
the line to be 126pts long, or roughly 4.8pts/character. Assuming that
the font width is directly proportional to font size, this works out to
the dimensionless number
char_width = 0.48
The optimal line length can then be calculated as
line_length = (75 characters)*char_width*font_size
We know that 1pt = (1/72) inch., so for 75 characters of 10pt sized
text, the lines should be
127mm
wide.
Or, the other way around, assuming a standard sized A4 paper (210mm * 297mm) with 35mm margins, the text area is 140mm * 227mm. We can rearrange the formula for the line length a bit and calculate
font_size = line_length/(75 characters * char_width)
This gives us an optimal font size of 11pt. Good to know.
HTML5 Template for WebApp
I've been doing a few 1-off web apps lately. I tried to validate them with W3C and saw that my Aptana-Studio html template was actually not compliant.
Now I am using this template, and it it seems to be OK:
<!DOCTYPE html>
<html lang="en">
  <head>
    <meta charset=utf-8 />
    <style type="text/css">
      /* style goes here */
    </style>
    <script type="text/javascript">
      // script goes here
    </script>
    <title>Title</title>
  </head>
  <body>
    <h1>App</h1>
  </body>
</html>
I keep the JavaScript and the CSS inline on purpose to minimize load time.
Taylor Series Woes
Note: I still hate Mathematica. It swallows signs of certain expressions, it eats my files, and itgets units wrong. I hate to use it. But for quick hacks like the following, it's a nice tool.
I wanted to find a simplification for the following formula:
amp = amp0/(omega0^2 - omega^2 + I gamma omega)
(If you're wondering: the formula gives the amplitude term of the driven, damped, harmonic oscillator.)
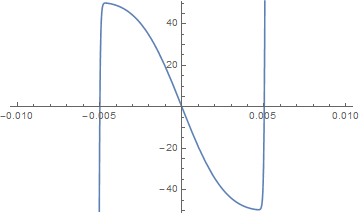
Specifically, I was interested in the real part of this amplitude term around the center of the resonance:
simple1 = Re[amp] /. omega -> omega0 + eps // ComplexExpand // Simplify
params = {amp0 -> 1, gamma -> 0.01, omega0 -> 1};
Plot[Re[simple1 /. params], {eps, -0.01, 0.01},
PlotRange -> {-51, 51}]

I thought, surely I can estimate this as a Taylor series! Looking at the plot, third order should work nicely.
simple2 =
 Re[amp] /. omega -> omega0 + eps // ComplexExpand //
    Series[#, {eps, 0, 3}] & // Normal // Collect[#, eps, Simplify] &
Plot[Re[simple2 /. params], {eps, -0.01, 0.01},
 PlotRange -> {-51, 51}]

Hmm, not so nice. Obviously I need more terms. 100 should be enough.
simple3 =
 Re[amp] /. omega -> omega0 + eps // ComplexExpand //
    Series[#, {eps, 0, 100}] & // Normal // Collect[#, eps, Simplify] &
Plot[Re[simple2 /. params], {eps, -0.01, 0.01},
 PlotRange -> {-51, 51}]
At this point I vaguely started remembering words of caution about Taylor series, with terms such as convergence radius being thrown around... I guess this is one example where the Taylor series will only get you so far (in this case, just about to the extrema). Tayloring sqrt(x) around 0 being another pathological (but quite obvious) example. Back in the day (TM), during math classes, these examples were all over the place. But having done physics for so long, it's strange to come upon a real-life case where the Taylor series fails.
For what it's worth, a better approximation of the real part of the amplitude term is
simple4 = -(2 amp0 eps)/(4 eps^2 omega0 + gamma^2 omega0)
Mirroring a Windows PC screen on a TV through a BeagleBone Black
This method is not suitable for showing movies or anything else that requires a fast framerate. I get about 1 FPS over a fast LAN connection, but it's enough for my purposes (looking at graphs with colleagues).
Preparations on the BeagleBone
Download the official Debian image (the one that runs on both BBB and BB White, and does not flash the MMC!). This image includes LXDE as a graphical environment. (I had no luck installing LXDE on a minimal Ubuntu image, so we'll have to use this official image.) Unfortunately, it has all kinds of stuff running on the BeagleBone (Cloud9 development environment...) which makes it a security nightmare. Oh well, I am running it in a somewhat trusted environment...
Copy the image on a uSD card. When I used Windows for the copying, I ended up with an unbootable uSD card (three or four solid lights instead of blinkenlights...). So instead I used Linux (Ubuntu) to install Debian on the uSD, using these commands:
mount   # -> find out the location of the uSD card. For me: /dev/sdb
sudo umount /dev/sdb1
sudo umount /dev/sdb2
xz -d bone-debian-7.5-2014-05-14-2gb.img.xz
sudo dd if=bone-debian-7.5-2014-05-14-2gb.img of=/dev/sdb bs=1M
The last step took almost an hour to finish.
Boot up the BeagleBone and do the standard steps to add another user and to delete the default user (Debian and Ubuntu are so closely related that this process is identical). I made sure to run
bash /opt/scripts/tools/grow_partition.sh
to make use of the full space on my uSD card (not just 2GB).
Edit the autologin-line in the lightdm.conf file, so that the new standard user will be logged in automatically.
nano /etc/lightdm/lightdm.conf
 # Look for the autologin line, change debian -> bob or so
Install the necessary vnc packages:
sudo apt-get install x11vnc
sudo apt-get install xtightvncviewer
Add the following line to /etc/xdg/lxsession/LXDE/autostart:
@xtightvncviewer -fullscreen -listen 0
@xset s noblank
@xset s off
@xset -dpms
The first line makes sure a VNC-viewer is started in "listening" mode on bootup, the last three lines disable screen blanking and power-saving and such nonsense.
Finally, connect the BeagleBone to a TV.
VNC'ing into the main Display from outside
Now, if I want to VNC into the "main screen" of the BeagleBone, I first ssh into the BeagleBone and run the command
x11vnc -display :0
Note: This is extremely unsafe, because now there is no password set. For first tests that's okay.
On Windows, I use "TightVNC Viewer" to open a connection to the BeagleBone on port 5900 ("192.168.0.50::5590", note the double "::"!). This is useful for troubleshooting.
"Mirroring" a PC screen to the BeagleBone
I had some trouble to start the following command via ssh, so I put into the autostart file of the Window manager:
xtightvncviewer -fullscreen -listen 0
Here, "0" is the display on which the VNC viewer should be running in full-screen mode. Now, using TightVNC Server on Windows, I can attach a listening viewer (using the address "192.168.0.50::5500" - again, note the double "::"!).
Automating the Windows TightVNC Server startup with a batch file
The following batch file start the VNC Server, attaches the listening client, and then waits for another keystroke to end the program again. Modify tvncpath and bbb-address to your liking. Note: I don't have TightVNC registered as a service, because I do not want it running unless it absolutely has to. The script probably fails if you have TightVNC registered as a service.
@echo off

set tvncpath="c:\Program Files\TightVNC\tvnserver.exe"
set bbb-address="192.168.0.50"

rem Check if tvnserver is running
tasklist /FI "IMAGENAME eq tvnserver.exe" | findstr "tvnserver.exe" >nul
if %ERRORLEVEL% == 1 goto starttvnc
goto afterstarttvnc

:starttvnc
start "" %tvncpath%
rem Wait 0.5s for the server to start up
ping 192.0.2.2 -n 1 -w 500 > nul

:afterstarttvnc

start "" %tvncpath% -controlapp -sharerect 1920x1080+0+0
start "" %tvncpath% -controlapp -connect %bbb-address%

echo press any key to stop sharing
pause >nul

rem Check if tvnserver is (still) running
tasklist /FI "IMAGENAME eq tvnserver.exe" | findstr "tvnserver.exe" >nul
if %ERRORLEVEL% == 1 goto afterstoptvnc
start "" %tvncpath% -controlapp -disconnectall
start "" %tvncpath% -controlapp -shutdown

:afterstoptvnc
Undeleteting a file in Ubuntu
Future me, please note that I'm not claiming that the following solution is recommended, but it worked for me this time:
- Pulled the power plug of the computer to prevent further writes to disk. There are more elegant solution, but this machine had lots of demons with disk IO running.
- Tried booting into live system, this failed for unknown reasons
- Took hard-drive out of the computer and moved it to exernal USB drive case
- Plugged USB into another Ubuntu machine. It was (unfortunately) automatically mounted, and I remounted it as read-only
sudo mount --options=remount,ro /dev/sdb1
- Installed extundelete
sudo apt-get install extundelete
- Tried to restore the lost file, then the folder it was in, but unfortunately the following commands failed with an "extundelete could not find correct inode" error.
sudo extundelete --restore-file /home/username/datafolder/importantfile.txt /dev/sdb3
sudo extundelete --restore-directory /home/username/datafolder/ /deb/sdb1
- Note that you have specify the partition file, not the device file
(
/sdb1instead of/sdb). - I may have gotten the original path of my lost importantfile.txt wrong, which might explain the inode error.
- What finally worked was:
sudo extundelete --restore-all /dev/sdb1
This restored my file and surprisingly few other files. I guess when you delete something in Ubuntu, you better act fast.
Wordpress: Switching to Child-Theme
I had made a minor
tweak
to this site's .css file, and today I decided to move that tweak into
a child-theme, so that it
would "stick" after updating the main theme.
The instructions boil down to:
- Create a folder
wp-content/themes/twentyeleven-childon the server (I am using the twentyeleven theme) - Create a
style.cssfile - Copy/paste the necessary css-lines from Wordpress, and modify the appropriate lines.
- Add custom css at the bottom of the file
- Switch to Child Theme in WordPress settings, under "Appearance -> Themes".
Problem: Now all my previous settings of the main theme (which I had made under "Appearance -> Customize" were gone! They weren't really gone though, they were just "unset". I had to go into "Appearance -> Customize" again and redo the following:
- Old header image is gone: Choose it again, it's still among the uploaded files
- Old menus are gone: Choose them again in the "Navigation" subpanel
- Header text was displayed: I had to unset this again
I'm sure there are good reasons why these settings don't automatically carry over to a child-theme. Still, it's a bit of a surprise to do this "super-easy-can't-break-anything" procedure and then have to wade through settings again...
For future reference, this is what my child-theme looks like: A single
style.css file in a twentyeleven-child folder:
/*
 Theme Name:   Twenty Eleven Child
 Theme URI:    http://hoeckerson.de/notes/
 Description:  Twenty Eleven Child Theme for minor tweaks
 Author:       Hoeckerson
 Author URI:   http://hoeckerson.de
 Template:     twentyeleven
 Version:      1.0.0
 Tags:         tweaks
 Text Domain:  twenty-eleven-child
*/


@import url("../twentyeleven/style.css");


/* =Theme customization starts here
-------------------------------------------------------------- */

#lookmabezier {
    width: 50px;
    height: 50px;
    margin: 50px; 50px;
    background-color: #88F;
    line-height: 50px;
    text-align: center;
    transition-property: transform;
    transition-duration: 0.5s;
    transition-timing-function: cubic-bezier(0.85, 0, 0.15, 1);
    transition-delay: 0s;
}

#bezier-demo-container:hover #lookmabezier {
    transform: translateX(200px);
    transition-property: transform;
    transition-duration: 0.5s;
    transition-timing-function: cubic-bezier(0.85, 0, 0.15, 1);
    transition-delay: 0s;
}
BeagleBone as a Webcam
Note: I have not really gotten this to work yet and am currently asking StackOverflow. No matter what webcam I use (I tried three: Logitech C920, HP 3100, and a non-descript el-cheapo SD webcam), the BeagleBone Black freezes after a few (el-cheapo) or after a few dozen (the brand-name cams) acquisitions. I don't know what error causes it, but I occasionally see the following errors in dmesg, before it actually freezes completely:
dmesg | tail -n 3
-> [ 220.258214] musb_host_rx 1762: Rx interrupt with no errors or packet!
-> [ 490.302277] musb_ep_program 896: broken !rx_reinit, ep13 csr 0003
-> [ 490.308731] musb_host_rx 1762: Rx interrupt with no errors or packet!
Generally, it is recommended to switch the BeagleBone to a beefier power supply in these situations, but that did not help for me (I tried four powersupplies; two USB and two via barrel connector). I also tried two different distributions (Ubuntu + official Debian, where I also updated to the latest Kernel), and three different BeagleBones (two Rev. A5A and one A5C). I suspect an error on the hardware side of the BeagleBone - there have always been problems with USB support.
Update: Using the RevA5C BeagleBone does seem to work, at least in some of the configuration. dmseg still reports the same errors, and 1 in 4 images are bad (black), but at least the BeagleBone does not crash so often anymore. This is still an unsatisfactory result.
The setup:
Install fswebcam
sudo apt-get install fswebcam
Add yourself to the video group (your name is Bob, of course)
sudo adduser bob video
Log out and back in for the change to take effect.
Attach webcam via USB and make sure that the BeagleBone sees it:
lsusb
 -> Bus 002 Device 002: ID 056e:032a Logitech, Inc. HD Pro Webcam C920
Take a test picture. If the picture is bad, try a delay of one second so
that the camera has time to set itself up. You may also try to skip a
few frames (option -S).
fswebcam test-pic.png
fswebcam -D 1 test-pic.png
Make a config file for fswebcam - otherwise the commands can get quite long.
makedir ~/webcam
nano ~/webcam/fswebcam.conf
Add the following lines to it (or something similar):
background
loop 10
resolution 1920x1080
scale 1280x720
title "Fishcam"
timestamp "%d.%m.%Y %H:%M:%S (%Z)"
jpeg 70
banner-colour #FF000000
line-colour #FF000000
no-shadow
save /tmp/aquarium.jpg
This makes fswebcam run in the background, take a picture every 10 seconds at a high resolution, but downscales it before saving it as jpg. It adds a title and a timestamp to the picture.
Call fswebcam with path to config file
fswebcam -c ~/webcam/fswebcam.conf
End it using pkill.
pkill fswebcam
The beaglebone uses flash storage as its "hard drive", and its best not to write to it too often. So in order to not write a new image to disk every ten seconds, we will create a small RAM-disk. This is a "virtual hard drive" that stays inside RAM at all times. We'll put the command to create this disk into fstab, so that it is created during each boot.
sudo nano /etc/fstab
Append the following line to create a 10 Megabyte RAM-disk and mount it on folder /tmp:
tmpfs /tmp tmpfs defaults,noatime,nosuid,nodev,noexec,mode=1777,size=10M 0 0
Make sure that the mount point /tmp exists, if not create it:
sudo mkdir /tmp
Reboot so that your system can create the RAM-disk. (You can also do it
from command line using mount -t tmpfs -o size=2048M tmpfs /tmp/).
In order to make the pictures available on the web, install apache webserver (link to article goes here) and add a symbolic link to the file that fswebcam will save:
sudo ln -s /tmp/aquarium.jpg /var/www/html/aquarium.jpg
Start fswebcam and enter the IP adress of your Beaglebone into the adressbar of your browser (on a PC that is in the same local network, of course). For me that is at
http://192.168.0.123/aquarium.jpg
You can either update manuall every 10 seconds or write a small script that makes the browser refresh every 10 seconds:
sudo nano /var/www/html/fishcam.html
Enter the following file contents:
<!DOCTYPE html>
<html>
  <head>
    <meta charset="utf-8">
    <meta http-equiv="X-UA-Compatible" content="IE=edge,chrome=1">
    <title>FishCam</title>
    <meta name="description" content="">
  </head>
  <body>
    <img src="aquarium.jpg" id="aquarium" />
    <div id="message">Image is updated every 10 seconds.</div>
    <div id="last-update"></div>
    <noscript>Enable JavaScript for automatic updates.</noscript>
    <script>
      var myVar = setInterval(function(){reloadImage()}, 10000);
      function reloadImage() {
        var aquariumElement = document.getElementById('aquarium');
        aquariumElement.src = 'aquarium.jpg?rand=' + Math.random();
        var d = new Date();
        var t = d.toLocaleTimeString();
        document.getElementById("last-update").innerHTML = t;
      }
    </script>
  </body>
</html>
Now, in the browser, go to /fishcam.html and bask in the glory of your new webcam. All that is left is to make the BeagleBone accessible from the internet (forward port 80 on your router).
Reminder: Always center your x-data before fitting!
There are two problems if :
- You introduce correlations between the parameters of your fit.
- The fit can become ill-conditioned.
The first problem is easy to see in an example: If you have a linear model, and if your data lies far off to the right, then the fitted y-intercept is very sensitive to the fitted slope. In other words: Your fit-parameters are highly correlated.
The latter only happens if you have "big" x-offsets or x-scatter in your data. The problem is that the matrices that need to be solved to find the best fit are "ill-conditioned", that is they become sensitive to numerical errors.
This can happen surprisingly early, as seen in the following three plots with x-offsets of 0, 100, and 10000, respectively:


The moderate offset of 1000 (middle plot) obviously poses no problem, but the big offset makes the fit unusable.
If you compute the linear fit via the "basic fitting" dialog, Matlab will warn you about the "ill-conditioned matrix" problem, but if you compute the fit programmatically, there is no such warning!
Bottom line: Always subtract mean(x) before fitting!